
Complete Prop Tutorial for your Sokka Cosplay
Avatar the Last Airbender displays a show with a wide range of characters, from heroes to villains, all of which are entirely unique in personality and design alike. Although we all fell in love with Aang, Katara, and Toph, we will always remember the personable Sokka!. He may not be the master of all four elements, but he sure is the master of wit and of the boomerang, so we're here to show you how to make his cosplay props in these easy to follow steps!
The Boomerang
To begin, we'll need to make the most important part of any Sokka cosplay: his boomerang! First things first, we need some tools for the job as recommended by this video. Below is a list of what you'll need:
-heat gun -multi-surface paint in white and blue (FolkArt)
Now, after you gathered your supplies, most of which can be purchased at your local hardware store, you need to make a pattern. On this pattern you'll need to measure out the specific measurements for each side of the boomerang like so:
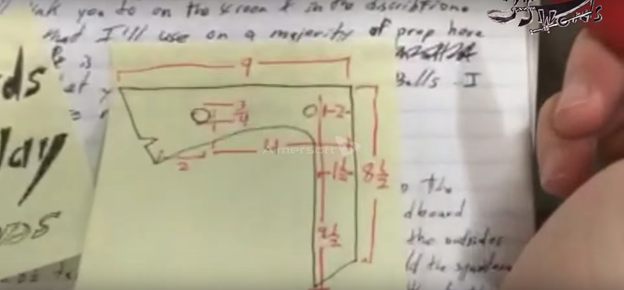
Next you'll need to duplicate the pattern and cut both out on two separate pieces of cardboard. From here, you'll be taking your popsicle sticks and taping them to the sides of one of the pieces for durability purposes, making sure to trip away where the holes are and the marking where you'll be trimming at the edges.


After the popsicle sticks are trimmed and properly in place, add the other cardboard piece on top, sandwiching them both together. Check to make sure the holes and edges lineup with each piece and then tape it all together!

Once the two cardboard pieces are firmly taped together, begin drawing the same boomerang pattern twice on your WonderFlex, making sure to add a small border.

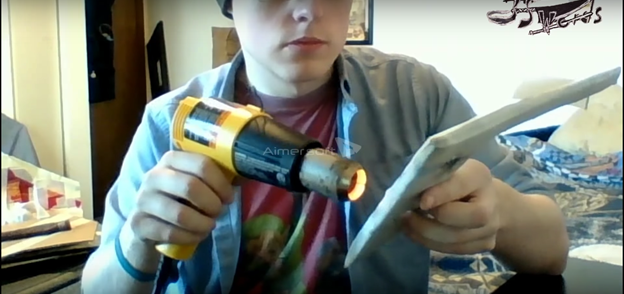
Using the heat gun, press one of the pieces of WonderFlex around the cardboard, pressing it down around the edges and molding it to the shape.

After covering one side completely with the WonderFlex, continue to do the same steps for the other side!
Making sure your pieces are melted together completely, you'll be able to continue on to the last step: painting! Start with the white paint as a type of primer in a thin coat over the whole surface.

Once the white paint is completely dry, add the blue paint with the white border and you've got your boomerang!

The Space Sword
Sokka's boomerang is a pretty essential part of the entire cosplay, but if you're serious about kicking fire-nation butt, then you'll need his space sword as well!
To begin this next prop with the guide of this video, you'll be using the exact same supplies as the boomerang with the addition of:
-Folk Art enamel white acrylic paint
-paint in colors black, yellow, orange and brown
-brown fabric
To begin, grab the wooden dowel and mark at 8.5 inches for where the blade meets the handle.

From here, you'll be taking your cardboard and cutting out four pieces, each 26 inches long and 1 1/8 inches wide.

With your four pieces of cardboard, begin taping them to your wooden dowel, starting from the 8 inch mark made previously to the end of the dowel. Once tapped together, cut four small slits (at a 45 degree angle) at the very end of the sword.

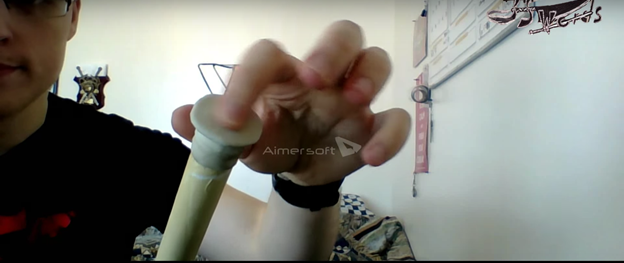
Next we move on to the handle, taking paper and wrapping it around to increase its overall thickness.

At the initial 8 inch mark on the dowel, cut the cardboard blade up 3 inches.
From here you'll move on to the handle! With two pieces of cardboard and one piece of styrofoam, cut out this specific pentagon shape with these measurements:

With these pieces, you'll be sandwiching the styrofoam piece in between the two cardboard pieces like so:

With the final structure of the sword built, you'll be moving on to the WonderFlex. For the blade, you'll be needing two rectangular pieces, each 26 inches long and 8 1/4 inches wide.

Begin using the heat gun to apply the two pieces to the length of the sword, heating one side at time.

Going to the opposite end of your sword, trace out a circle for your pommel and attach it using the heat gun like the previous step.
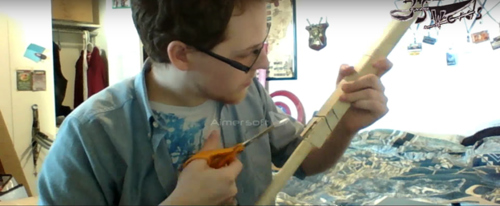
If you have an eye for detail, go ahead and trace out the lotus design on the bottom of the pommel and the intricate markings on the handle as well.

To really complete the look of the handle, you'll be taking a piece of your brown fabric, 3 1/3 inches wide and 8 1/4 inches long, and be gluing it smoothly along the surface with your hot glue gun.

From here you'll be adding the details to the hilt, following the drawing below for reference:

Lastly, to give it that refined look, you'll be giving the sword a nice coat of paint! Start with a light coat of the enamel base to prime the material. After this initial coat dries, you've got the green light to paint the rest of the sword!
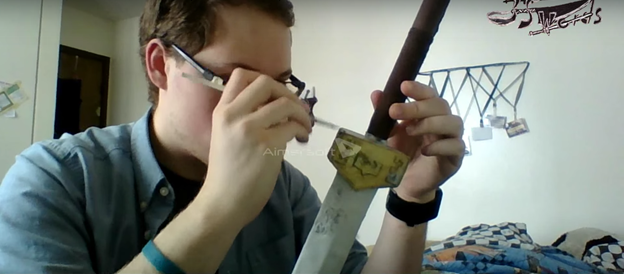
And just like that you've made two of Sokka's battle-ready weapons!
The Necklace
Weapons are pretty awesome we admit, but a Sokka cosplay would not be complete with out his famous warrior necklace! Following this video, you will need these specific tools:
-wooden beads
-acrylic paint (matte ivory/off-white)
-sponge brush
-wire
To start, take your nail file and begin filing down the wooden beads to get off the original enamel surface and to give you with a rough surface perfect for priming!

Once you've given the wooden beads a nice rough texture, take your wire, straighten it out, and wrap it around your neck for an accurate size measurement.

After you've found the best fit, take your wire cutters and snip them where you measured around your neck. With the ends of your wire, curl each end towards itself to make two hooks, one closed and the other slightly open.

Grab your paint for the next step, as you'll now be painting each individual bead, about three to four coats for every one.

Once dried, the beads should like the picture below:

At this point, you can begin to put the beads on the wire and finish the necklace!

The final product should resemble something like this:

